Growing Gladiolus
The gladiolus is as beautiful as it is easy to grow. Planting, culture, care, insects, and disease are discussed here.
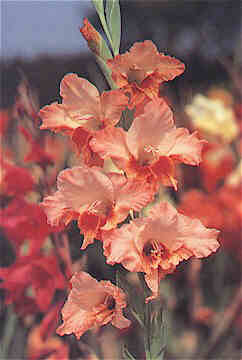
Gladioli are one of the most popular flowers for garden use, and are easy to grow. The plants, ranging from two to six feet in height, have sturdy sword-shaped leaves and produce flower spikes with trumpet-shaped florets borne in double rows.
Members of the iris family, gladiolus have great diversity of flower color and shape. Flower shapes range from those with plain petals to those that are deeply ruffled and cut. The colors cover the spectrum and there are solid as well as bicolor types. Florets range in size from 1 inch in diameter up to giants 8 inches in diameter.
Gladiolus is principally native to
Glads bloom from July until frost. By planting over the season, a garden can boast continuous color all summer.
Site Selection
Glads can grow on a variety of soils, though sandy loam is preferred. It is important that drainage is adequate in any soil. Improve drainage by adding organic matter if puddles remain for more than 24 hours after the soil is saturated.
Composted manure is an excellent additive, but it must be mixed into the soil well so there is little or no contact with the glads. Contact with the manure could encourage rots in the plants.
Organic matter also can help loosen up the soil, making it easier to work.
The preferred pH for glads is 6.0 to 6.5. Generally, any soil that produces good vegetable crops will produce good glads. To provide the best growing conditions for glads, break up and till the soil about two weeks before planting.
Glads that have to compete with larger plants for water, nutrients, and sunlight may have poor growth. Select a location providing full sun to get strong and erect stems with large, bright flowers. Stake the plants to protect them from strong winds and to maintain straight spikes and stems. Glads also need good air circulation while growing to reduce insect and disease problems.
Planting
Glads grow from underground food storage structures called corms. Corms are solid masses of tissue, rather than layered like true bulbs. Corms have growing points on their upper surface, and are actually compact stems.
Each year a new corm forms on top of the old one, which shrinks and dies. The new corm forms soon after leaves emerge. The papery husks which form around the corm are actually the bases of old leaves. These husks overlap on the corm, facing the pointed tip. One or more corms may be formed from an old corm.
Cormels also may be formed. Cormels are the very small corms formed around the base of the corm. They often are used in propagation of a glad variety, and when planted will form small corms the following year.
Plant glads in the spring as soon as the ground is workable. Generally, early May begins the planting season. Extend the bloom season by multiple planting through mid-June. Days to bloom can vary from 60 to 120 days, depending on variety and size of corm. With planning, the blooming period can extend for several months.
Before planting, treat glad corms to help prevent disease problems later in the season. Either dust or dip in fungicide. Soak the corms, following label directions for concentration and timing. An alternative to the fungicide is soaking corms in a Lysol solution. Soak them for three hours in a solution of one teaspoon of Lysol per one quart of water. Rinse well and plant corms while still wet.
Plant glads in rows, beds, or as small groupings. When planting glads for cut flower use, plant them in rows. Rows for cut glads should be 18 to 36 inches apart, depending on size of flowers desired and space available.
Plant corms with pointed side upright.
To plant corms, dig a trench or hole. Corms may be spaced fairly close together (two to six inches), but for large, show-quality flowers, more space is needed. Two to four times the corm diameter is a good spacing rule. Determine the final depth and spacing for planting by corm size and soil type. Plant large corms about six to seven inches deep in light soils, and about four inches deep in heavy soils. Plant smaller corms shallower. Set corms in place, pointed side up, scar side down. Be sure the corms are upright. If corms are planted as deeply as possible, they will be held firmly in place and require little staking or support.
Culture
During the summer glads require a minimum of care. It is important to control weeds while plants are growing. Frequent, shallow cultivation is required, since deep cultivation may damage roots. This cultivation will also keep the soil loose and help plant growth. Herbicides are available to control grasses in glads. Mulching will help control weeds and reduce moisture loss.
Provide enough water throughout the growing season. Lack of water may cause shorter spikes, smaller florets, and smaller corms for next season. Moisture availability is very important when flower spikes are beginning to form. At least one inch of water is needed each week for good growth, provided the water soaks in six to eight inches deep.
Fertilization can help produce large flowers. Apply at one time or throughout the growing season. Two pounds of a well-balanced fertilizer per 100 square feet per year is recommended. If a single application is used, apply a slow release nitrogen type at planting time. Be sure to keep fertilizers away from corms to avoid damage to the plants. Make split applications at midseason and when flower spikes appear.
Support of a glad early in the season can lead to good growth all season. When plants are about eight inches tall, hill the soil around the base. As glads continue growth, staking generally is necessary. Staking will ensure tall, straight flower spikes. Small groupings of plants may need to be staked individually. Rows of glads may be staked to wires extended the length of the row. However staking is done, provide for some movement by the flower spike to prevent damage and breakage.
Flower Spikes
Glads are primarily grown for use as a cut flower. To get the most enjoyment from flower spikes, pick when the first florets are beginning to open. The remaining florets will open in time.
Cut glads leaving at least four leaves on the plant.
Cut the spikes in the early morning or evening for maximum freshness. Remove flower spikes with a slanted cut from a sharp knife. Be sure at least four leaves are left on the plant to allow corm development. Immediately place spikes in a deep container of warm water to keep the florets from wilting. Leave glads in a cool, dark place for several hours before arranging. This will help flowers harden off and last longer.
As the florets fade, remove them to keep the glads looking their best. Change the water daily, and give stems a fresh cut to extend the life of the glads.
For flower spikes left in the garden, remove the wilted florets to keep the plants looking good. Cut flower stems as they bloom out unless collection of seed is an objective. Development of seed pods can put great strain on corm development.
Complete Care
Dig and store glad corms each fall. Corms are ready for digging about six weeks after they have bloomed. By this time foliage should be yellowing and dying back. If the tops are still healthy, let corms grow to add to corm development, until just before a hard freeze. Once the foliage dies back, dig the corms to prevent disease problems while corms are in the ground.
Dig corms when the soil is dry. This will make digging and cleaning corms much easier. Carefully lift corms with a spade or spading fork. If the tiny cormels are desired for future propagation, dig carefully and sort by varieties immediately. Shake off soil and cut the tops off just above the corms.
Place corms in a light, warm, well-ventilated place for several weeks to cure. Corms are cured to get rid of excess moisture in corm and husks as rapidly as possible. This helps prevent storage problems.
Store glad corms in labeled trays at 35-45 degrees F.
After corms are cured, separate the new corm from the old dried corm. These two parts should snap apart easily by hand and leave a clean scar on the new corm. Remove the loose husks, leaving the wrapper husks intact. Also remove the small cormels and place in a labeled paper bag for winter storage.
Before putting the corms into storage, dust them with an insecticide for thrip control. Be sure to remove all diseased corms from those going into storage.
Place the corms in trays, paper bags, mesh onion bags, or even nylon stockings for winter storage. Be sure all corms are clearly labeled. Keep the varieties separated since they multiply at different rates. Light colors such as white, pink, and yellow are usually more vigorous and may multiply faster than darker colors. If the corms are mixed it may seem the lighter colors are taking over.
Store corms in a dark, cool, dry, well-ventilated location. Ideal storage temperatures are 35 to 45°F. 5).
Insects and Disease
The major insect pest of glads is the gladiolus thrip. This tiny, black insect is about 1/25 inch long and very active in attacking glad flowers and foliage. The thrips will rasp the foliage, leaving whitish streaks. Florets may be attacked leaving them discolored, misshapen, and often unable to open. Thrips overwinter on the corms and will injure them at that time. To help prevent problems, dust the glads throughout the season with an insecticide labeled for thrip control. To prevent storage problems, dust corms before storing them.
Several diseases may affect glad stems, leaves and corms. Most of these problems can be controlled by selecting good planting sites and using clean corms. Be sure corms are properly cured before they are stored, and check them periodically during the storage period. Getting rid of infected corms will help keep other corms clean.